How to Make Bubble Pizza with Biscuits
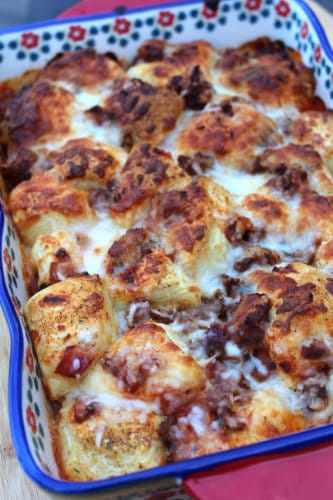
Bubble pizza is one of those meals from childhood that you just need in your life sometimes. Its simplicity makes it a quick weeknight meal and you can customize it to to please your family’s taste buds.
Even though my mom made this frequently when I was growing up, it’s a dish I had forgotten about until a Facebook post from Taste of Home caught my attention. I was immediately taken back to 1980-something, which caused me to call my mom and get her recipe.
Little did I know, she really didn’t have a recipe. This is one of those “mom foods” that can be pulled together with whatever is in the fridge.
Ingredients
The ingredients for bubble pizza can be customized to your liking. Here’s what I used for this recipe (see the recipe card for quantities):
- Canned jumbo biscuits
- Italian venison sausage
- Spaghetti sauce
- Mozzarella cheese
Canned biscuits are a homemaker’s time saver, especially if you struggle with making your own biscuits! I use the 8-count tubes of buttermilk biscuits and cut each into quarters. If you have tube of smaller, 10-count biscuits, cut them in half for this recipe.
I frequently use venison in place of various other beef or pork products in recipes because we have a freezer full year-round.
While pizza sauce will work fine for this recipe, I prefer spaghetti (or pasta) sauce for bubble pizza. Biscuits will soak up sauce faster than pizza dough, so the spaghetti sauce stretches farther and is more economical than pizza sauce.
Tips on Cooking Venison
If you do use ground venison or venison sausage, you will want to watch the cooking time. Ground beef and pork sausage take about 10 minutes to cook through. There is also a lot of fat in both of these products which helps maintain moisture during cooking.
Depending on how your meat processor prepares your ground venison, lard or tallow may be added to the venison before packaging. This provides much needed fat for the cooking process. However, because venison is a much leaner meat, it will cook more quickly than beef or pork.
Variations
Just like you can make pizza however you want, you can make bubble pizza with whatever ingredients you have on hand.
- All the meats: Use cooked sausage, pepperoni, ground beef, ham, bacon, Canadian bacon or any combination of these. Chunks work better in bubble pizza, so crumble bacon and cut ham into cubes.
- Veggie only: Swap out the meats with your favorite vegetables. Cut these into bite-size bits, too.
- Theme it: BBQ ranch pizza, anyone? Use the same ingredients as your favorite themed or specialty pizza.
- Kick it up: Spice up your bubble pizza by adding Aleppo pepper, red pepper flakes, hot sauce, or sriracha to your sauce.
Helpful Equipment
Anytime I cook ground beef, venison, sausage or anything else than needs to be broken up while cooking, I grab my handy Tovolo Ground Meat Tool. There are several different brands and style of ground meat choppers, but the Tovolo design allows you to use it as a chopper and turner, so you can easily turn meat over as you are cooking it. The drain slots allow grease to escape while using the turner feature.
You need one… trust me on this!

Storage and Reheating
If you have any bubble pizza left, you can store it in the fridge for a few days. This will easily microwave, too. It’s a great midnight snack, according to my teenage daughter!
Food Safety
Food safety is important in any kitchen. Here are a few things to remember as you are preparing your dish. These tips come from years of home cooking as well as teaching university-level cooking classes.
- Wash your hands after handling the raw sausage so you don’t cross-contaminate your kitchen. Make sure to toss the packaging in the trash and don’t let it sit on the countertop.
- Do not use the same utensils on cooked food that previously touched raw meat. Once your ground meat is cooked, place the meat chopper in the dishwasher so you don’t accidentally use it for something else.
- Remember to refrigerate any leftover spaghetti sauce. It will last for several days and can be incorporated into other dishes.
- Refrigerate your bubble pizza in airtight containers within 2 hours after it comes out of the oven. It should be cooled to room temperature much sooner than that. Leaving food out at room temperature for extended amounts of time can cause bacteria growth. Nobody wants that!


